Our Blog

by Admin
|

Jan 20, 2026
Checklist for Maintaining Streak-Free Windows
Want spotless, streak-free windows without the hassle? Here's a quick guide to keeping your windows crystal clear, whether you're tackling them yourself or hiring professionals. Clean windows brighten your space, improve energy efficiency, and even help reduce allergens. Follow these simple steps:
- Gather Tools: Use a squeegee, microfiber cloths, vinegar-based solution, and distilled water for the best results.
- Prep the Area: Dust frames, sills, and tracks before applying any cleaner to avoid smudges.
- Clean Glass: Work on cloudy days, use a proper squeegee technique, and dry edges with microfiber cloths.
- Clean Screens and Tracks: Remove screens, vacuum debris, and wash with soapy water.
- Inspect and Buff: Check for streaks under natural light and buff with a dry cloth.
- Set a Schedule: Clean interior windows monthly, exterior windows twice a year, or more often based on your location.
For hard-to-reach spots or a deeper clean, professional services can save time and effort. Whether you're DIYing or outsourcing, regular upkeep keeps your home or business looking polished year-round.

6-Step Checklist for Streak-Free Window Cleaning
The Secret To Streak Free Window Cleaning - How To Wash Windows Like A Pro
Step 1: Gather Your Cleaning Tools and Supplies
Getting streak-free windows starts with solid preparation. The right tools can transform window cleaning from a chore into a quick and efficient task. You can gather everything you need for under $25 [6].
Choose the Right Cleaning Solutions
Steer clear of ammonia-based cleaners - they leave behind a film that attracts dust and moisture [4]. This residue can be especially harmful to tinted windows, as ammonia can damage or even peel their protective coatings [4].
Instead, opt for a tried-and-true DIY solution: mix one part distilled white vinegar with ten parts warm water, and add a few drops of liquid dish soap [4].
"A vinegar dilution is one of the most available and cost-effective solutions, and it's underutilized" [11].
The vinegar works to break down mineral deposits and grime, while the dish soap cuts through grease - perfect for kitchen windows [11]. For best results, use distilled water instead of tap water. Tap water often contains minerals like calcium and magnesium, which can leave spots when they dry [11]. Distilled water, on the other hand, dries streak-free.
Get the Right Cleaning Tools
A good squeegee is essential. Choose one with a 10–12 inch rubber blade to clear away the cleaning solution in a single, smooth pass [10].
Pair your squeegee with microfiber cloths instead of paper towels. Paper towels tend to leave behind lint and fibers, making your windows look less clean. Microfiber cloths, however, trap dirt and absorb moisture without shedding [4].
For tall or hard-to-reach windows, an extension pole is a game-changer. It allows you to clean safely from the ground without the need for a ladder [4]. You’ll also need a bucket for your cleaning solution, a microfiber scrubber to apply soapy water, and a vacuum with a brush attachment to dust frames and sills before you start [9].
Set Up for Safe Cleaning
Safety should always come first, especially when dealing with high windows. If you need to use a ladder, make sure it’s stable and positioned on level ground. Better yet, an extension pole can help you avoid the risks of climbing altogether [10].
Protect your hands by wearing gloves, and never use a razor blade on dry glass or at an angle greater than 45° - this could scratch the surface [6]. For particularly high or hard-to-reach windows, it’s often best to call in professionals equipped to handle the job safely (see Step 6). With your tools and safety measures ready, it’s time to prepare your windows and work area.
Step 2: Prepare Your Windows and Work Area
Preparation is key to avoiding streaks and muddy residue caused by hidden dirt mixing with cleaning solutions[16]. Clearing your workspace and properly prepping the windows ensures a smoother, cleaner process.
Clear the Space Around Windows
Setting up your work area properly makes all the difference. Start by protecting your floors with a drop cloth, pulling back curtains or blinds to keep them dry[4], and moving any furniture that might block access to the windows. Remove window screens and place them on a tarp for separate cleaning[14]. This way, you can fully access the glass and avoid dirtying the screens while you work.
Marla Mock, President of Molly Maid, emphasizes the importance of being organized:
"You have to work fast when cleaning windows, so lay out all your tools and supplies to ensure everything is within reach and streaks don't form while you're looking for something."[3]
Dust Window Frames and Sills
Before applying any liquid, take time to clear away loose dirt, cobwebs, and debris from the frames, sills, and tracks[14]. Use a vacuum with a soft brush attachment to gently remove surface dust without scratching the frames[15]. For tight spots and corners where grime builds up, an old toothbrush can be a handy tool.
Skipping this step can lead to trouble. Dirt left behind can mix with your cleaning solution, creating a muddy mess that smears across the glass. As Bob Vila points out:
"A lot of grime can hide in the window tracks and frame. When mixed with window cleaner, that dirt may form an unsightly sludge that can drip onto the glass while cleaning."[16]
Work from the top down to avoid re-soiling areas you've already cleaned[3]. With your windows and frames prepped, you're ready to tackle the glass for a streak-free shine.
Step 3: Wash the Window Glass
Now it’s time to clean the glass. The secret to achieving streak-free windows lies in using the right technique and working quickly, so the cleaning solution doesn’t dry on the surface. To avoid streaks and haze, clean windows on cloudy days or in shaded areas when the solution won’t evaporate too fast[12]. Once you’re ready, apply the cleaning solution evenly across the glass.
For large exterior windows, dip a microfiber scrubber into your cleaning solution and spread it evenly over the surface. For interior windows, it’s better to spray the solution directly onto a microfiber cloth instead of the glass. This prevents excess moisture from seeping into the window frames[4]. A good rule of thumb is to use one spray of cleaner for every 2×2-foot section of glass - this avoids over-saturating the surface, which can lead to streaks.
Use a Squeegee Properly
After applying the solution, grab your squeegee to remove it. Hold the squeegee at a 30-degree angle against the glass, and grip it firmly with your thumb resting along the handle for better control[12][17]. Start at the top corner of the window with a dry blade to create a clean starting point.
You can either pull the squeegee straight down in one smooth motion or use a continuous "S" pattern, overlapping each stroke by about an inch to avoid leaving water marks behind[12]. After every stroke, dry the rubber edge completely with a lint-free cloth to keep it from smudging the glass.
If the squeegee makes a chattering noise or skips, it could mean the glass is too dry or the rubber blade needs replacing[12]. For windows that are higher up or tricky to reach, attach your squeegee to an extension pole for easier access[18]. This method ensures even hard-to-reach windows stay spotless.
Dry Edges with Microfiber Cloths
Even after using the squeegee, water often lingers along the edges of the glass where the blade can’t reach. Use a separate, dry microfiber cloth to wipe the edges immediately, preventing spots from forming[10]. For corners and the perimeter of the glass, a dry microfiber cloth offers precise control to absorb moisture without smudging the center[12]. Always use a clean, dry cloth for this step - using a damp or dirty one can spread grime and undo your hard work[14].
sbb-itb-4ae7296
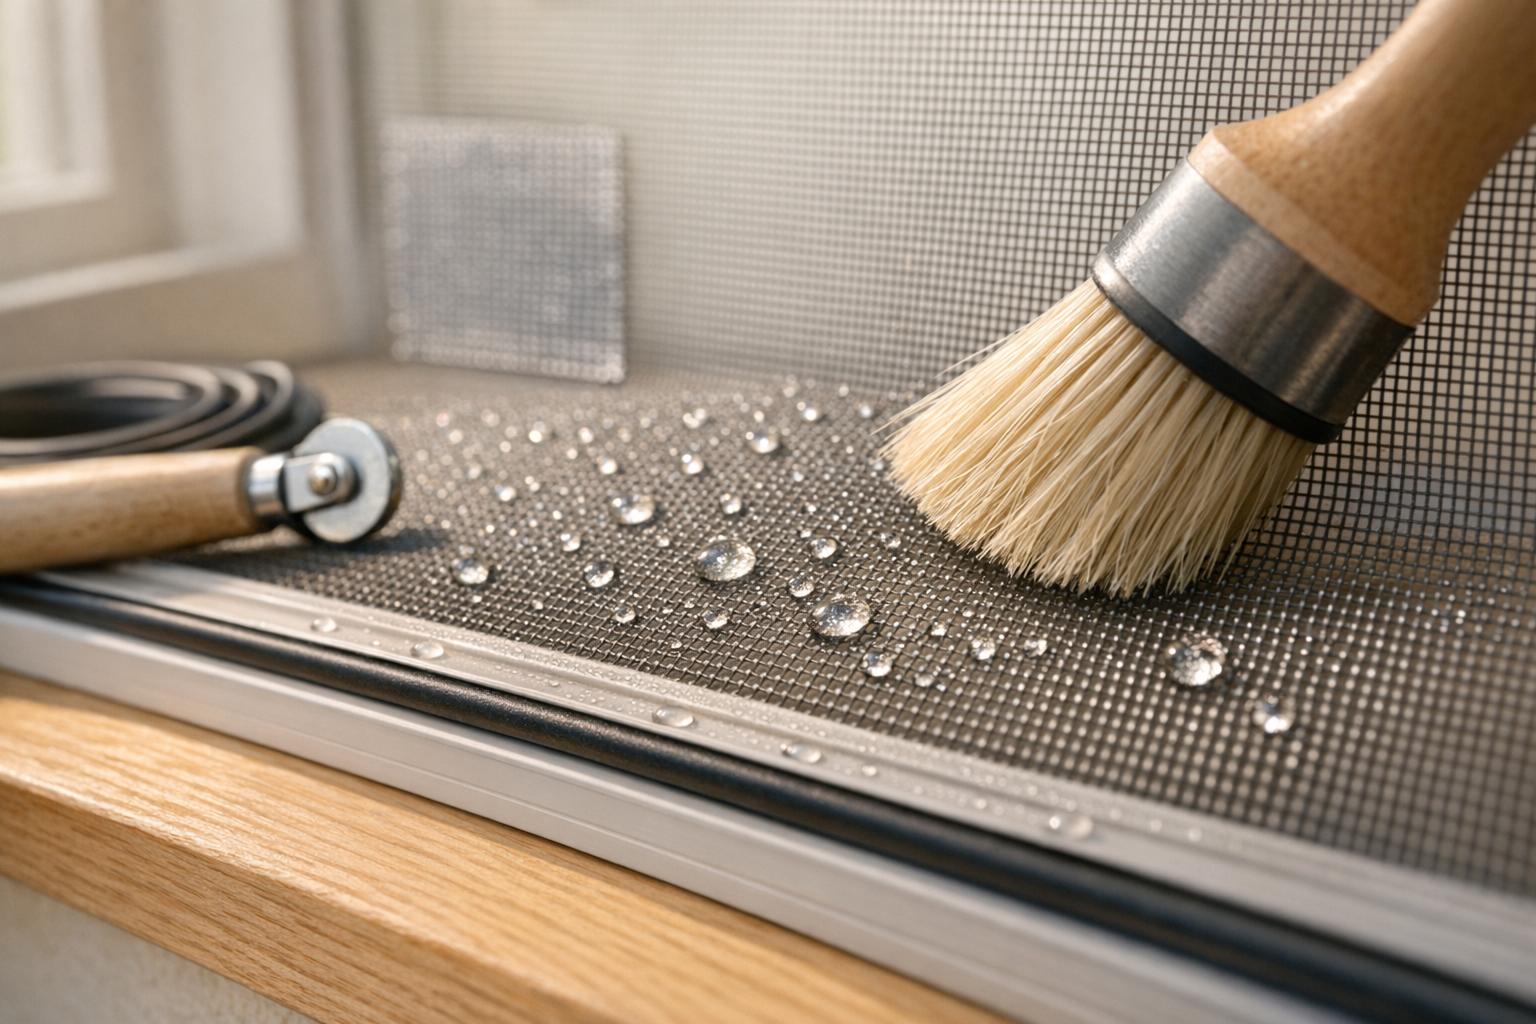
Step 4: Clean Screens and Window Tracks
Once your glass is sparkling clean, don’t overlook the screens and tracks. Even the clearest windows can lose their luster if dirty screens and tracks reintroduce dust and pollen during rain or windy days. Plus, clean screens help reduce allergens from settling back onto the glass.
"If you clean your windows and do not clean your screens, the dirt on the screens can negatively impact your newly cleaned windows." - Craig Thomas, Virtual Expert, Frontdoor [19]
Keeping tracks clean not only ensures smooth window operation but also prevents buildup that could wear down the hardware. A thorough cleaning routine tackles all these elements together for the best results.
Remove and Wash Screens
Start by carefully removing your screens. If you have multiple screens, label them so you can reinstall them in the correct spots. Lay them flat on a sturdy surface - like a tarp on the ground - to avoid bending or damaging them during cleaning.
Use a vacuum with a soft-bristle attachment to clear away loose dust, pollen, and cobwebs from both sides of each screen. Then, gently scrub the screens in circular motions with a soft-bristle brush and a mixture of warm water and mild dish soap. Rinse thoroughly using a low-pressure garden hose to avoid warping, and let the screens air dry completely before putting them back in place.
Clean Tracks and Hardware
Next, turn your attention to the window tracks, which often collect dirt, debris, and even insects. Use a vacuum with a crevice attachment to clear out the loose mess. Then, apply a mixture of equal parts white vinegar and water to the tracks and let it sit for 10–15 minutes to loosen stubborn buildup. For those hard-to-reach corners, an old toothbrush works wonders. Wipe everything down with a damp microfiber cloth and make sure the tracks are completely dry to keep dust from sticking again.
Don’t forget the window hinges and hardware! Wipe them down with a soft cloth and warm, soapy water. Skip harsh chemicals, as they can damage or discolor the finishes. Keeping these components clean ensures your windows not only look great but also function smoothly.
Step 5: Check for Streaks and Buff
Once the screens and tracks are clean, it’s time to inspect the glass. Even with the most careful cleaning, faint streaks can appear as the glass dries. A quick buff can make all the difference between windows that look clean and those that are truly spotless.
Buff with a Dry Cloth
Grab a clean, dry microfiber cloth and buff the glass right away to avoid streaks caused by residue[4]. Stick to straight horizontal or vertical strokes - circular motions tend to leave smears[1].
"I use two towels: one that's damp to get the first spray of solution off and a dry one after for a streak-free shine." - Scott Pine, Owner, Crystal Clear[5]
Here’s a pro tip: buff the inside of your window using vertical strokes and the outside using horizontal ones[13][3]. This technique makes it easier to pinpoint which side has streaks if any remain. If your cloth starts feeling damp, switch to a fresh, dry one[20]. Pay extra attention to edges and corners, where water and cleaning solution often collect. Once you’re done buffing, check the glass under natural light to ensure no streaks are left behind.
Check Windows in Natural Light
Natural light is your best friend when it comes to spotting streaks that artificial lighting might miss. Look at the glass from different angles, as smudges often become visible only when viewed from certain perspectives[21]. For stubborn streaks, apply a small amount of undiluted vinegar, then buff it dry[7][3].
Timing matters, too. While natural light is essential, avoid direct, intense sunlight, as it can cause cleaning solutions to dry too quickly and leave marks. Overcast days or cooler times - like early morning or late afternoon - are ideal for both cleaning and inspecting[7][2][21].
"We usually wash one side of the house, and then go back to the other side as the sun moves across. Start on the west side in the morning and end up on the east side so that the sun is never in the way." - Scott Pine, Founder and Owner, Crystal Clear[5]
This final step ensures your windows are streak-free and ready to shine between professional cleanings.
Step 6: Set Up a Regular Cleaning Schedule
Keeping your windows looking their best over time requires more than just a one-time deep clean. A regular cleaning schedule not only preserves their shine but also makes future cleaning sessions quicker and easier.
Create a Cleaning Routine
For interior windows, aim for a monthly cleaning schedule - or biweekly in areas that see more activity, like the kitchen or patio doors, where smudges and dust can build up quickly[8]. High-traffic areas may even need weekly touch-ups to stay spotless. Exterior windows, on the other hand, typically benefit from a deep clean twice a year, usually in the spring and fall, to tackle seasonal grime and keep the glass in good condition[8].
"Clean interior windows monthly or when they become smudged, while exterior windows should receive a thorough cleaning twice yearly in spring and fall to maintain appearance and extend window lifespan." - Stephanie Minasian-Koncewicz, This Old House[8]
Local factors can influence how often you should clean. For example, homes in areas with high traffic or pollution might need exterior cleaning every few months[8]. Coastal properties often deal with salt spray, requiring more frequent attention, while homes surrounded by trees may face extra pollen and sap buildup. If you want to go the extra mile for crystal-clear windows, professional cleaning can make a big difference.
Hire Professional Cleaners
When your DIY efforts aren’t enough, it might be time to call in the professionals. Professional cleaners can deliver a deeper clean with longer-lasting results. They use advanced tools like deionized water systems and water-fed poles, which remove mineral residue and prevent streaking[22]. Plus, they clean every part of the window unit - including tracks, frames, sills, and screens - helping to keep dirt and grime from returning. Another bonus? Pros can spot early signs of issues like failed seals or wood rot, potentially saving you from expensive repairs later.
For those in Charlotte, NC, Window Cowboy serves the city and nearby areas like Lake Norman, Mooresville, Hickory, Rock Hill, and Lake Wylie. They specialize in tackling hard-to-reach spots, such as skylights and second-story windows, ensuring a streak-free finish. Many residential homes benefit from 2–4 professional cleanings per year[22]. On average, a whole-home professional cleaning costs between $150 and $300, with most homeowners spending around $260[8][6].
With Charlotte enjoying about 218 sunny days annually, scheduling professional cleanings in late spring and mid-summer can help keep your windows clear and in great shape[22].
Conclusion
Keeping your windows clean and well-maintained doesn't just brighten up your home - it also boosts natural light, reduces allergens, and helps improve energy efficiency. By sticking to this straightforward checklist, you can ensure your windows stay spotless and functional for years to come.
Start by tackling all window surfaces, including frames, sills, and tracks, before moving on to the glass. This method prevents dirt buildup and makes future cleaning much easier. Using the techniques outlined in this guide will help you achieve the best results with minimal effort.
For those hard-to-reach spots like skylights or upper-story windows, calling in professional cleaners is a smart move. They’re equipped to remove up to 99.9% of impurities from glass pores[23] and can identify potential issues like seal failures or frame damage before they turn into expensive repairs. If you're in Charlotte, Window Cowboy provides expert cleaning services for homes and businesses in areas like Lake Norman, Mooresville, Hickory, Rock Hill, and Lake Wylie. Their advanced cleaning technology ensures streak-free results that last, helping protect your windows and maintain your property’s value.
Whether you choose to clean your windows yourself or hire professionals, regular upkeep is key to protecting your investment and keeping your home looking its best. Stick to this checklist, and enjoy clear, gleaming windows that brighten your space year-round.
FAQs
What’s the best way to clean windows without streaks on sunny days?
Cleaning windows on sunny days can be a bit of a challenge. Why? The cleaning solution dries too fast, often leaving behind those annoying streaks. To avoid this, aim to clean your windows during the cooler parts of the day - either early morning or late afternoon. If that’s not possible, try focusing on windows that are shaded.
A great streak-free solution is a simple mix of equal parts white vinegar and water. For an extra boost, add a small splash of rubbing alcohol to help the solution evaporate faster and cut down on streaks. Lightly mist the glass with this mixture - don’t overdo it - and use a lint-free microfiber cloth to wipe it clean. This will help avoid any leftover residue.
For the best finish, grab a squeegee. Start at the top of the window and work your way down, wiping the blade after each pass to keep things clean. Once you're done, use a clean microfiber cloth to dry the edges and corners for that polished look.
Got large windows or hard-to-reach spots? It might be worth calling in the pros. Services like Window Cowboy in the Greater Charlotte area specialize in streak-free, long-lasting window cleaning, saving you time and effort.
Why should I use distilled water instead of tap water for cleaning windows?
Using distilled water for cleaning windows is a smart choice because it’s free of the minerals and impurities found in tap water. These minerals often leave behind streaks or spots once the water evaporates, making the glass look less than perfect. Distilled water, on the other hand, helps achieve a streak-free, crystal-clear finish. To get the best results, pair distilled water with a quality cleaning solution and use a lint-free cloth or a squeegee for a polished look.
How often should I schedule professional cleaning for hard-to-reach windows?
For those tricky, hard-to-reach windows, scheduling professional cleaning every 3 to 6 months is a smart move. The exact timing often depends on your surroundings. If your home or business is near busy roads, construction zones, or along the coast, you might notice dust, pollen, or salt buildup more quickly, requiring more frequent cleanings.
A good way to stay on track is to book cleanings seasonally - think mid-April, mid-July, mid-October, and mid-January. After each cleaning, pay attention to how long your windows stay clean. If dirt and grime return quickly, stick with a 3-month schedule. If they remain clean for longer, you can stretch it to 6 months.
If you're in the Greater Charlotte, NC area, Window Cowboy specializes in keeping even the most hard-to-reach windows spotless. Their expert cleaning methods deliver streak-free, sparkling results, ensuring your windows stay crystal clear and your views stay stunning all year long.